
Manual (English)
Creating an application
To create an application to unpack / copy the basic structure provided (Sourceforge or PHPClasses) to the folder containing your Web site, in this case I will call «example».
Run a Web browser and set the path to your Web application in the case of this manual is «example» and I’m running on my localhost then http://localhost/ example when you run this page will be redirected to http://localhost/example/config/erros.html if you downloaded the version without libraries, as in this picture.

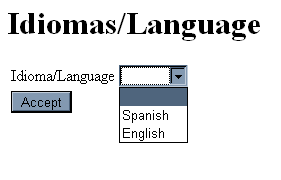
If you download libraries and place the folder <rootsite>/libs/ and reloading the page will be redirected to the page to select the language of the application interface builder:
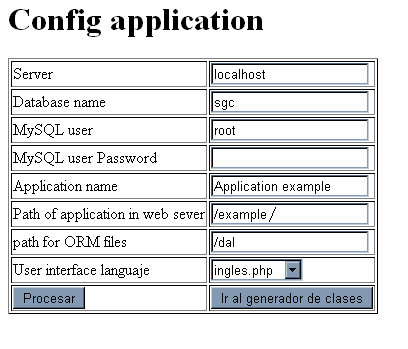
The next step is to configure the parameters for the database, the application path, the folder containing the ORM classes and language of the user interface.
Server: MySQL server name for this example is: localhost
Database name: The name of the database in this case: sgc
MySQL user: the MySQL Server user
MySQL user Password: password MySQL Server
Application name: Application name, title to the top of page.
Path of application in web sever: application path, if the location of the application is web server root is «/» in the case of this example would be «/ example /»
Path for ORM files: folder for files generated ORM. Note: This folder must exist.
User interface language choice: Select the language for the user interface.
The next step is to choose which tables of the database you want to generate the ORM classes and metadata, and the table containing the fields of security (login, password and user name) only one table per application and is marked option «is safety»

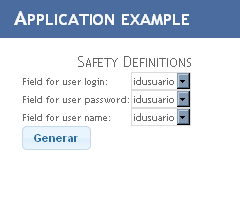
After pressing the «process» must choose the safety options in the table:
Field for user login: field containing the login names. eg. admin.
Field for user password: field containing the passwords. eg. admin
Field for user name: field that will contain the names of the users. eg. Application Manager.
By clicking the «Generate» button you will see a link that will take you to the login application.
The generated application
This application consists of a general index, crud’s pages for each table selected to build the application.
All pages have in common a header that displays the application name, user name, current date, and the button to sign out.
The listings page (list.php) is conformed by three sections the first is located at the top shows the filters applied to the table, sorting options and the link to insert a new record. The central part of the grid contains data showing the table, on the left side of the grid is a checkbox that permits selection of multiple records. In the bottom of the page there are three elements, pager: displays records in groups of 10 and the option to show all «All». The button allows you to delete the selected records «select Deleted», a combo that determines the page orientation and the button to print the listing that creates a PDF with the data shown in the table, using the filters and orders that were assigned.

Customizing the application
The files for customization
If you go to the folder where the files were generated ORM by default and for this example I called «dal» is in <applicationroot> / dal / can see that there is a file with the name of the table «<name table>. php «and a file» _meta.php <table name> «. The first is the ORM and the other contains the metadata.
The metadata class:
All classes that handle this metadata of the tables named as follows: <Table <nobre of _meta. all these classes inherit from BaseEntity which has the following properties:
name: The name of the table and should not be changed for any reason.
displayname: Indicates the label to be displayed in place of the table name.
mostrar: Indicates whether the table is displayed in the list.
aCampos: basecolumn array type that defines the metadata for each field.
campomostrar: this compatibility is maintained properties and indicates the field that will debuelto for foreign keys.
readonly: If the table can not be written, if the true value is assigned restricted operations insert, edit and delete.
The class basecolumn
DEFINITION This class contains the metadata of the table fields and their properties are:
nombre: the name of the field and should not be changed for any reason.
displayname: Label to show the end user.
mostrar: indicates if the field is to be displayed or not, is of type booleam, if true field is displayed.
readonly Indicates field is read-only
espk: indicates if the field is the primary key of the table should not be changed for any reason.
esfk: Indicates if the field is a foreign key. It should not be changed for any reason.
tipo: type of the field. Accepted types:
int => integer
varchar => string
decimal => decimal
datetime => datetime
float => float
tinyint (1) => bool
text => text
ancho: Width of the field.
tipocontrol: indicates that control is visible when you edit the field and can be: integer
string
decimal
datetime
float
bool
text
requerido: Indicates if the field can not be empty when inserting / editing.
Posicion: The position that will be shown in the interface, starting at zero.
filtrar: Indicates if it is to create an object in the page list to filter by this field automatically assigned an object if the field is a boolean and FK.
filtroobject: Object to make filters, three types of objects: filter_text (fk’s), filter_bool (Boolean) and filter_date (type date)
subtipo: Only for DateTime type fields and determines if only date or only time.
campoRelacion: Indicates the field assigned to the external table foreign key. Do not modify for any reason.
tablaRelacion: Table referred to FK. Do not modify for any reason.
totalizar: If a field is integer, float and decimal can be total, causing the last line of the grid on the listings page is used to set the totals. booleam type.
defaultValue: default value of the field.
Changing field labels and tables
It is common to use mnemonics in names of tables and fields but not to show the end user but its significance for this we must use the class that contains the metadata, it will find uan class with the table name followed by «_meta» so if we have a table called «ventascab» find a file called «ventascab_meta»:

The highlighted lines in the image are the change we need to show a different label to the field name, in this case the table is called ventascab but I want to display «Sales Master» for this change $ this-> displayname = «ventascab «for $ this-> displayname =» sales Master «and could change one by one the field labels changing the displayname of each element in the array of fields, as in Figure nmuestro for field» idventascab «by «ID»,

I can still edit all fields in the table always in the item named «displayname», leaving the list screen like this:

